Video: Expanding your site to more languages
Webmaster Level: Intermediate to Advanced
We filmed a video providing more details about expanding your site to more languages or country-based language variations. The video covers details about rel=”alternate” hreflang and potential implementation on your multilingual and/or multinational site.
Video and slides on expanding your site to more languages
You can watch the entire video or skip to the relevant sections:
- Potential search issues with international sites
- Questions to ask within your company before beginning international expansion
- International site use cases
- rel=”alternate” hreflang and hreflang=”x-default”: details and implementation
- Best practices
Additional resources on hreflang include:
- Webmaster Help Center article on rel=”alternate” hreflang and hreflang=”x-default”
- More blog posts
- Working with multilingual sites
- Working with multiregional sites
- New markup for multilingual content
- Introducing “x-default hreflang” for international landing pages”
- Webmaster discussion forum FAQ on internationalization
- Webmaster discussion forum for internationalization (review answers or post your own question!)
Good luck as you expand your site to more languages!
Written by Maile Ohye, Developer Programs Tech Lead

Better backlink data for site owners
Webmaster level: intermediate
In recent years, our free Webmaster Tools product has provided roughly 100,000 backlinks when you click the “Download more sample links” button. Until now, we’ve selected those links primarily by lexicographical order. Th…
rel=”author” frequently asked (advanced) questions
Webmaster Level: Intermediate to Advanced
Using authorship helps searchers discover great information by highlighting content from authors who they might find interesting. If you’re an author, signing up for authorship will help users recognize content that you’ve written. Additionally, searchers can click the byline to see more articles you’ve authored or to follow you on Google+. It’s that simple! Well, except for several advanced questions that we’d like to help answer…
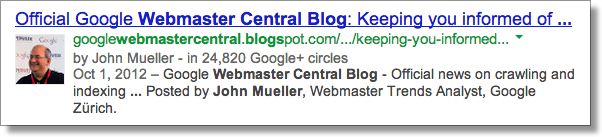
Authorship featured in search results from one of my favorite authors, John Mueller
Clicking the author’s byline in search results can reveal more articles and a Google+ profile
Recent authorship questions
1. What kind of pages can be used with authorship?
Good question! You can increase the likelihood that we show authorship for your site by only using authorship markup on pages that meet these criteria:
- The URL/page contains a single article (or subsequent versions of the article) or single piece of content, by the same author. This means that the page isn’t a list of articles or an updating feed. If the author frequently switches on the page, then the annotation is no longer helpful to searchers and is less likely to be featured.
- The URL/page consists primarily of content written by the author.
- Showing a clear byline on the page, stating the author wrote the article and using the same name as used on their Google+ profile.
2. Can I use a company mascot as an author and have authorship annotation in search results? For my pest control business, I’d like to write as the “Pied Piper.”
You’re free to write articles in the manner you prefer — your users may really like the Pied Piper idea. However, for authorship annotation in search results, Google prefers to feature a human who wrote the content. By doing so, authorship annotation better indicates that a search result is the perspective of a person, and this helps add credibility for searchers.
Again, because currently we want to feature people, link authorship markup to an individual’s profile rather than linking to a company’s Google+ Page.
3. If I use authorship on articles available in different languages, such asexample.com/en/article1.html for English and example.com/fr/article1.html for the French translation,
should I link to two separate author/Google+ profiles written in each language?
In your scenario, both articles:
example.com/en/article1.html
andexample.com/fr/article1.html
should link to the same Google+ profile in the author’s language of choice.
4. Is it possible to add two authors for one article?
In the current search user interface, we only support one author per article, blog post, etc. We’re still experimenting to find the optimal outcome for searchers when more than one author is specified.
5. How can I prevent Google from showing authorship?
The fastest way to prevent authorship annotation is to make the author’s Google+ profile not discoverable in search results. Otherwise, if you still want to keep your profile in search results, then you can remove any profile or contributor links to the website, or remove the markup so that it no longer connects with your profile.
6. What’s the difference between rel=author vs rel=publisher?
rel=publisher helps a business create a shared identity by linking the business’ website (often from the homepage) to the business’ Google+ Page. rel=author helps individuals (authors!) associate their individual articles from a URL or website to their Google+ profile. While rel=author and rel=publisher are both link relationships, they’re actually completely independent of one another.
7. Can I use authorship on my site’s property listings or product pages since one of my employees has customized the description?
Authorship annotation is useful to searchers because it signals that a page conveys a real person’s perspective or analysis on a topic. Since property listings and product pages are less perspective/analysis oriented, we discourage using authorship in these cases. However, an article about products that provides helpful commentary, such as, “Camera X vs. Camera Y: Faceoff in the Arizona Desert” could have authorship.
If you have additional questions, don’t forget to check out (and even post your question if you don’t see it covered :) in the Webmaster Forum.
Written by Maile Ohye, Developer Programs Tech Lead
Making smartphone sites load fast
Webmaster level: Intermediate
Users tell us they use smartphones to search online because it’s quick and convenient, but today’s average mobile page typically takes more than 7 seconds to load. Wouldn’t it be great if mobile pages loaded in under one second? Today we’re announcing new guidelines and an updated PageSpeed Insights tool to help webmasters optimize their mobile pages for best rendering performance.
Prioritizing above-the-fold content
Research shows that users’ flow is interrupted if pages take longer than one second to load. To deliver the best experience and keep the visitor engaged, our guidelines focus on rendering some content, known as the above-the-fold content, to users in one second (or less!) while the rest of the page continues to load and render in the background. The above-the-fold HTML, CSS, and JS is known as the critical rendering path.
We can achieve sub-second rendering of the above-the-fold content on mobile networks by applying the following best practices:
- Server must render the response (< 200 ms)
- Number of redirects should be minimized
- Number of roundtrips to first render should be minimized
- Avoid external blocking JavaScript and CSS in above-the-fold content
- Reserve time for browser layout and rendering (200 ms)
- Optimize JavaScript execution and rendering time
These are explained in more details in the mobile-specific help pages, and, when you’re ready, you can test your pages and the improvements you make using the PageSpeed Insights
tool.
As always, if you have any questions or feedback, please post in our discussion group.
Posted by Bryan McQuade, Software Engineer, and Pierre Far, Webmaster Trends Analyst
View manual webspam actions in Webmaster Tools
Webmaster level: All

We strive to keep spam out of our users’ search results. This includes both improving our webspam algorithms as well as taking manual action for violations of our quality guidelines. Many webmasters want to see if their sites are affected by a manual webspam action, so today we’re introducing a new feature that should help. The manual action viewer in Webmaster Tools shows information about actions taken by the manual webspam team that directly affect that site’s ranking in Google’s web search results. To try it out, go to Webmaster Tools and click on the “Manual Actions” link under “Search Traffic.”
You’ll probably see a message that says, “No manual webspam actions found.” A recent analysis of our index showed that well under 2% of domains we’ve seen are manually removed for webspam. If you see this message, then your site doesn’t have a manual removal or direct demotion for webspam reasons.
If your site is in the very small fraction that do have a manual spam action, chances are we’ve already notified you in Webmaster Tools. We’ll keep sending those notifications, but now you can also do a live check against our internal webspam systems. Here’s what it would look like if Google had taken manual action on a specific section of a site for “User-generated spam”:
In this hypothetical example, there isn’t a site-wide match, but there is a “partial match.” A partial match means the action applies only to a specific section of a site. In this case, the webmaster has a problem with other people leaving spam on mattcutts.com/forum/. By fixing this common issue, the webmaster can not only help restore his forum’s rankings on Google, but also improve the experience for his users. Clicking the “Learn more” link will offer new resources for troubleshooting.
Once you’ve corrected any violations of Google’s quality guidelines, the next step is to request reconsideration. With this new feature, you’ll find a simpler and more streamlined reconsideration request process. Now, when you visit the reconsideration request page, you’ll be able to check your site for manual actions, and then request reconsideration only if there’s a manual action applied to your site. If you do have a webspam issue to address, you can do so directly from the Manual Actions page by clicking “Request a review.”
The manual action viewer delivers on a popular feature request. We hope it reassures the vast majority of webmasters who have nothing to worry about. For the small number of people who have real webspam issues to address, we hope this new information helps speed up the troubleshooting. If you have questions, come find us in the Webmaster Help Forum or stop by our Office Hours.
Posted by Matt Cutts, Distinguished Engineer
In-depth articles in search results
Webmaster level: all
Users often turn to Google to answer a quick question, but research suggests that up to 10% of users’ daily information needs involve learning about a broad topic. That’s why today we’re introducing new search results to help users find in-depth articles.
These results are ranked algorithmically based on many signals that look for high-quality, in-depth content. You can help our algorithms understand your pages better by following these recommendations:
- use schema.org “article” markup,
- provide authorship markup,
- rel=next and rel=prev for paginated articles (also watch out for common rel=canonical mistakes),
- provide information about your organization’s logo,
- and of course, create compelling in-depth content.
Following these best practices along with our webmaster guidelines helps our systems to better understand your website’s content, and improves the chances of it appearing in this new set of search results.
The in-depth articles feature is rolling out now on google.com in English. For more information, check out our help center article, and feel free to post in the comments in our forums.
Posted by Pandu Nayak, Member of Technical Staff
A reminder about manipulative or deceptive behavior
Webmaster level: All
Our quality guidelines prohibit manipulative or deceptive behavior, and this stance has remained unchanged since the guidelines were first published over a decade ago. Recently, we’ve seen some user complaints about a deceptive technique which inserts new pages into users’ browsing histories. When users click the “back” button on their browser, they land on a new page that they’ve never visited before. Users coming from a search results page may think that they’re going back to their search results. Instead, they’re taken to a page that looks similar, but is actually entirely advertisements:

To protect our users, we may take action on, including removal of, sites which violate our quality guidelines, including for inserting deceptive or manipulative pages into a user’s browser history. As always, if you believe your site has been impacted by a manual spam action and is no longer violating our guidelines, you can let us know by requesting reconsideration.
Posted by Michael Wyszomierski, Search Quality Team
Easier navigation without GPS
Webmaster level: All
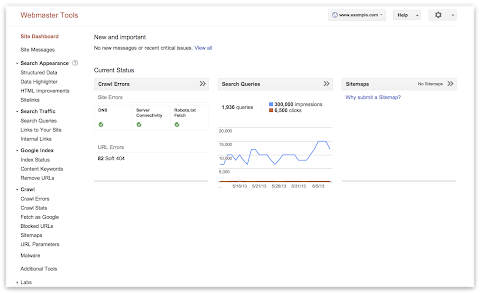

Today we’re unveiling a shiny new navigation in Webmaster Tools. The update will make the features you already use easier to find, as well as unveil some exciting additions.
Navigation reflects how search works
We’ve organized the Webmaster Tools features in groups that match the stages of search:
- Crawl: see information about how we discover and crawl your content. Here you will find crawl stats, crawl errors, any URLs you’ve blocked from crawling, Sitemaps, URL parameters, and the Fetch as Google feature.
- Google Index: keep track of how many of your pages are in Google’s index and how we understand their content: you can monitor the overall indexed counts for your site (Index Status), see what keywords we’ve found on your pages (Content Keywords), or request to remove URLs from the search results.
- Search Traffic: check how your pages are doing in the search results — how people find your site (Search Queries), who’s recommended your site (Links to Your Site), and see a sample of pages from your site that have incoming links from other internal pages.
- Search Appearance: mark up your pages to help Google understand your content better during indexing and potentially influence how your pages appear in our search results. This includes the Structured Data dashboard, Data Highlighter, Sitelinks, and HTML Improvements.

Account-level administrative tasks now accessible from the Settings menu
Account-level admin tasks such as setting User permissions, Site Settings, and Change of Address are now grouped under the gear icon in the top right corner so they’re always accessible to you:

This is the list of items as visible to site owners, “full” or “restricted” users will see a subset of these options. For example, if you’re a “restricted” user for a site, the “Users & Site Owners” menu item will not appear.
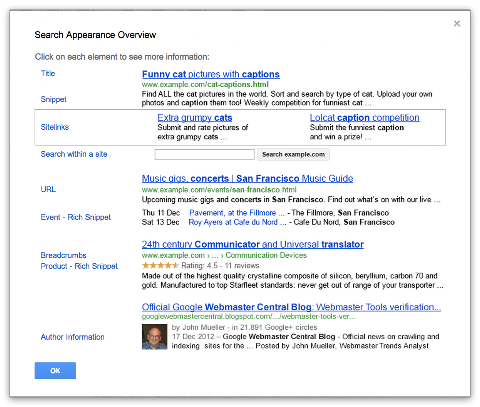
New Search Appearance pop-up
Beginner webmasters will appreciate the new Search Appearance pop-up, which can be used to visualize how your site may appear in search and learn more about the content or structure changes that may help to influence each element:

To access the pop-up window, click on the question mark icon next to the Search Appearance menu in the side navigation.
It includes the essential search result elements like title, snippet and URL, as well as optional elements such as sitelinks, breadcrumbs, search within a site, event and product rich snippets, and authorship information.
We hope the new navigation makes it easier for you to make the most of Webmaster Tools. As always, if you have additional questions, feel free to post in the Webmaster Help Forum.
Posted by Mariya Moeva, Webmaster Trends Analyst
Introducing website satisfaction by Google Consumer Surveys
Webmaster level: all
We’re now offering webmasters an easy and free way to collect feedback from your website visitors with website satisfaction surveys. All you have to do is paste a small snippet of code in the HTML for your website and this will load a discreet satisfaction survey in the lower right hand corner of your website. Google automatically aggregates and analyzes responses, providing the data back to you through a simple online interface.

Users will be asked to complete a four-question satisfaction survey. Surveys will run until they have received 500 responses and will start again after 30 days so you can track responses over time. This is currently limited to US English visitors on non-mobile devices. The default questions are free and you can customize questions for just $0.01 per response or $5.00 for 500 responses.

Survey Setup and Code Placement Tips
To set up the survey code, you’ll need to have access to the source code for your website.
- Sign into Google Consumer Surveys for website satisfaction to find the code snippet.
- You have the option to enter the website name and URL, survey timing, and survey frequency.
- Click on the “Activate survey” button when ready.
- Once you find the code snippet on top of the setup page, copy and paste it into your web page, just before the closing </head> tag. If your website uses templates to generate pages, enter it just before the closing </head> tag in the file that contains the <head> section.
If you have any questions, please read our Help Center article to learn more.
Posted by Marisa Currie-Rose
Backlinks and reconsideration requests
Webmaster level: advanced
When talking to site owners on Google Webmaster Forums we come across questions on reconsideration requests and how to handle backlink-related issues. Here are some common questions, along with our recommendations.
When should I file a reconsideration request?
If your site violates our Google Quality Guidelines or did in the past, a manual spam action may be applied to your site to prevent spam in our search results. You may learn about this violation from a notification in Google Webmaster Tools, or perhaps from someone else such as a previous owner or SEO of the site. To get this manual action revoked, first make sure that your site no longer violates the quality guidelines. After you’ve done that, it’s time to file a reconsideration request.
Should I file a reconsideration request if I think my site is affected by an algorithmic change?
Reconsideration requests are intended for sites with manual spam actions. If your site’s visibility has been solely affected by an algorithmic change, there’s no manual action to be revoked, and therefore no need to file a reconsideration request. If you’re unsure if it’s an algorithmic change or a manual action, and have found issues that you have resolved, then submitting a reconsideration request is fine.
How can I assess the quality of a site’s backlinks?
The links to your site section of Google Webmaster Tools is a great starting point for an investigation as it shows a significant amount of your site’s inbound links. If you know that you ran an SEO campaign during a particular period of time, downloading the latest links can come handy in slicing links created at that time. Using the links found in Google Webmaster Tools, we recommend looking for patterns that point to general issues that are worth resolving. For example, spammy blog comments, auto generated forum posts or text advertisements with links that pass PageRank are likely to be seen as unnatural links and would violate Google’s quality guidelines. For individual examples and hands-on advice we recommend getting help of peers and expert webmasters on the Google Webmaster Forum.
How do I clean a bad backlink profile?
Make sure to identify poor links first, then make a strong effort to get them either removed or nofollowed. Then use the Disavow Links Tool to deal with remaining unnatural backlinks. We recommend using domain-wide operator for sites with a complicated URL structure, very obvious spam sites, such as gibberish content sites or low quality sites with content that shows no editorial value. See our video on common mistakes when using the disavow tool for more information.
How much information do I need to provide?
Detailed documentation submitted along with a reconsideration request can contribute to its success, as it demonstrates the efforts made by the webmaster and helps Googlers with their investigation. If you are including a link to a shared document, make sure that it’s accessible to anyone with the link.
How long does it take to process reconsideration requests?
Reconsideration requests for sites affected by a manual spam action are investigated by a Googler. We strive to respond in a timely manner, normally within just a few days. However, the volume of incoming reconsideration requests can vary considerably, hence we don’t provide a guaranteed turnaround time.
What are the possible outcomes of a reconsideration request?
Upon submitting a reconsideration request, you will first receive an automated confirmation in Google Webmaster Tools. After your request is processed, we’ll send you another message to let you know the outcome of the request. In most cases, this message will either inform you that the manual action has been revoked or that your site still violates our quality guidelines.
Where can I get more guidance?
For more information on reconsideration requests, please visit our Help Center. And as always, the Google Webmaster Forum is a great place for further discussions as well as seeking more advice from experienced webmasters and Google guides.
Written by Kaspar Szymanski and Uli Lutz, Search Quality Team
Verify your site in Webmaster Tools using Google Tag Manager
Webmaster level: Intermediate
If you use Google Tag Manager to add and update your site tags, now you can quickly and easily verify ownership of your site in Webmaster Tools using the container snippet code.
Here’s how it’s done:
1. On the Webmaster Tools home page, click Manage site for the site you’d like to verify, then select Verify this site. If you haven’t added the site yet, you can click the Add a site button in the top right corner.

To do this, you must have “View, Edit, and Manage” account level permissions in Google Tag Manager.
2. On the Verification page, select Google Tag Manager as the verification method and follow the steps on your screen.

3. Click Verify.
And you’re done!
If you’ve got any questions about this verification method, drop by the Webmaster Help Forum.
Posted by Mariya Moeva, Webmaster Trends Analyst
Changes in rankings of smartphone search results
Webmaster level: IntermediateSmartphone users are a significant and fast growing segment of Internet users, and at Google we want them to experience the full richness of the web. As part of our efforts to improve the mobile web, we published our recomm…
6 Quick Tips for International Websites
Note from the editors: After previously looking into various ways to handle internationalization for Google’s web-search, here’s a post from Google Web Studio team members with tips for web developers.
3. Use the
4. Use the
Many websites exist in more than one language, and more and more websites are made available for more than one language. Yet, building a website for more than one language doesn’t simply mean translation, or localization (L10N), and that’s it. It requires a few more things, all of which are related to internationalization (I18N). In this post we share a few tips for international websites.
1. Make pages I18N-ready in the markup, not the style sheets
Language and directionality are inherent to the contents of the document. If possible you should hence always use markup, not style sheets, for internationalization purposes. Use @lang and @dir, at least on the html element:
<html lang="ar" dir="rtl">
Avoid coming up with your own solutions like special classes or IDs.
As for I18N in style sheets, you can’t always rely on CSS: The CSS spec defines that conforming user agents may ignore properties like direction or unicode-bidi. (For XML, the situation changes again. XML doesn’t offer special internationalization markup, so here it’s advisable to use CSS.)
2. Use one style sheet for all locales
Instead of creating separate style sheets for LTR and RTL directionality, or even each language, bundle everything in one style sheet. That makes your internationalization rules much easier to understand and maintain.
So instead of embedding an alternative style sheet like
<link href="default.rtl.css" rel="stylesheet">
just use your existing
<link href="default.css" rel="stylesheet">
When taking this approach you’ll need to complement existing CSS rules by their international counterparts:
3. Use the [dir='rtl'] attribute selector
Since we recommend to stick with the style sheet you have (tip #2), you need a different way of selecting elements you need to style differently for the other directionality. As RTL contents require specific markup (tip #1), this should be easy: For most modern browsers, we can simply use [dir='rtl'].
Here’s an example:
aside {
 float: right;
 margin: 0 0 1em 1em;
}

[dir='rtl'] aside {
 float: left;
 margin: 0 1em 1em 0;
}
4. Use the :lang() pseudo class
To target documents of a particular language, use the :lang() pseudo class. (Note that we’re talking documents here, not text snippets, as targeting snippets of a particular language makes things a little more complex.)
For example, if you discover that bold formatting doesn’t work very well for Chinese documents (which indeed it does not), use the following:
:lang(zh) strong,
:lang(zh) b {
 font-weight: normal;
 color: #900;
}
5. Mirror left- and right-related values
When working with both LTR and RTL contents it’s important to mirror all the values that change directionality. Among the properties to watch out for is everything related to borders, margins, and paddings, but also position-related properties, float, or text-align.
For example, what’s text-align: left in LTR needs to be text-align: right in RTL.
There are tools to make it easy to “flip” directionality. One of them is CSSJanus, though it has been written for the “separate style sheet” realm, not the “same style sheet” one.
6. Keep an eye on the details
Watch out for the following items:
- Images designed for left or right, like arrows or backgrounds, light sources in
box-shadowandtext-shadow values, and JavaScript positioning and animations: These may require being swapped and accommodated for in the opposite directionality. - Font sizes and fonts, especially for non-Latin alphabets: Depending on the script and font, the default font size may be too small. Consider tweaking the size and, if necessary, the font.
- CSS specificity: When using the
[dir='rtl'](or[dir='ltr']) hook (tip #2), you’re using a selector of higher specificity. This can lead to issues. Just have an eye out, and adjust accordingly.
If you have any questions or feedback, check the Internationalization Webmaster Help Forum, or leave your comments here.
Written by Jens O. Meiert and Tony Ruscoe, Tech Leads, Google Web Studio
Getting started with structured data
Webmaster level: All
If Google understands your website’s content in a structured way, we can present that content more accurately and more attractively to Google users. For example, our algorithms can enhance your search results with “rich snippets” when we understand that your page is a structured product listing, event, recipe, review, or similar. We can also feature your data in Knowledge Graph panels or in Google Now cards, helping to spread the word about your content.
Today we’re excited to announce two features that make it simpler than ever before to participate in structured data features. The first is an expansion of Data Highlighter to seven new types of structured data. The second is a brand new tool, the Structured Data Markup Helper.
Support for Products, Businesses, Reviews and more in Data Highlighter
Data Highlighter launched in December 2012 as a point-and-click tool for teaching Google the pattern of structured data about events on your website — without even having to edit your site’s HTML. Now, you can also use Data Highlighter to teach us about many other kinds of structured data on your site: products, local businesses, articles, software applications, movies, restaurants, and TV episodes.
To get started, visit Webmaster Tools, select your site, click the “Optimization” link in the left sidebar, and click “Data Highlighter”. You’ll be prompted to enter the URL of a typically structured page on your site (for example, a product or event’s detail page) and “tag” its key fields with your mouse.

The tagging process takes about 5 minutes for a single page, or about 15 minutes for a pattern of consistently formatted pages. At the end of the process, you’ll have the chance to verify Google’s understanding of your structured data and, if it’s correct, “publish” it to Google. Then, as your site is recrawled over time, your site will become eligible for enhanced displays of information like prices, reviews, and ratings right in the Google search results.
New Structured Data Markup Helper tool
While Data Highlighter is a great way to quickly teach Google about your site’s structured data without having to edit your HTML, it’s ultimately preferable to embed structured data markup directly into your web pages, so your structured content is available to everyone. To assist web authors with that task, we’re happy to announce a new tool: the Structured Data Markup Helper.
Like in Data Highlighter, you start by submitting a web page (URL or HTML source) and using your mouse to “tag” the key properties of the relevant data type. When you’re done, the Structured Data Markup Helper generates sample HTML code with microdata markup included. This code can be downloaded and used as a guide as you implement structured data on your website.

The Structured Data Markup Helper supports a subset of data types, including all the types supported by Data Highlighter as well as several types used for embedding structured data in Gmail. Consult schema.org for complete schema documentation.
We hope these two tools make it easier for all websites to participate in Google’s growing suite of structured data features! As always, please post in our forums if you have any questions or feedback.
Posted by Justin Boyan, Product Manager
Using schema.org markup for organization logos
Webmaster level: all
Today, we’re launching support for the schema.org markup for organization logos, a way to connect your site with an iconic image. We want you to be able to specify which image we use as your logo in Google search results.
Using schema.org Organization markup, you can indicate to our algorithms the location of your preferred logo. For example, a business whose homepage is www.example.com can add the following markup using visible on-page elements on their homepage:
<div itemscope itemtype="http://schema.org/Organization">
  <a itemprop="url" href="http://www.example.com/">Home</a>
  <img itemprop="logo" src="http://www.example.com/logo.png" />
</div>
This example indicates to Google that this image is designated as the organization’s logo image for the homepage also included in the markup, and, where possible, may be used in Google search results. Markup like this is a strong signal to our algorithms to show this image in preference over others, for example when we show Knowledge Graph on the right hand side based on users’ queries.
As always, please ask us in the Webmaster Help Forum if you have any questions.
Posted by RJ Ryan, Google Engineer
Introducing "x-default hreflang" for international landing pages
Webmaster Level: All
The homepages of multinational and multilingual websites are sometimes configured to point visitors to localized pages, either via redirects or by changing the content to reflect the user’s language. Today we’ll introduce a new rel-alternate-hreflang annotation that the webmaster can use to specify such homepages that is supported by both Google and Yandex.
To see this in action, let’s look at an example. The website example.com has content that targets users around the world as follows:
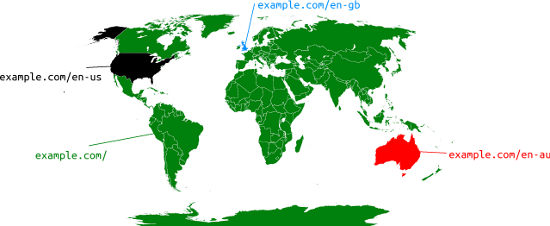
- http://example.com/en-gb: For English-speaking users in the UK
- http://example.com/en-us: For English-speaking users in the USA
- http://example.com/en-au: For English-speaking users in Australia
- http://example.com/: The homepage shows users a country selector and is the default page for users worldwide
In this case, the webmaster can annotate this cluster of pages using rel-alternate-hreflang using Sitemaps or using HTML link tags like this:
<link rel="alternate" href="http://example.com/en-gb" hreflang="en-gb" />
<link rel="alternate" href="http://example.com/en-us" hreflang="en-us" />
<link rel="alternate" href="http://example.com/en-au" hreflang="en-au" />
<link rel="alternate" href="http://example.com/" hreflang="x-default" />
The new x-default hreflang attribute value signals to our algorithms that this page doesn’t target any specific language or locale and is the default page when no other page is better suited. For example, it would be the page our algorithms try to show French-speaking searchers worldwide or English-speaking searchers on google.ca.
The same annotation applies for homepages that dynamically alter their contents based on a user’s perceived geolocation or the Accept-Language headers. The x-default hreflang value signals to our algorithms that such a page doesn’t target a specific language or locale.
As always, if you have any questions or feedback, please tell us in the Internationalization Webmaster Help Forum.
Posted by Pierre Far, Webmaster Trends Analyst
5 common mistakes with rel=canonical
Webmaster Level: Intermediate to Advanced
Including a rel=canonical link in your webpage is a strong hint to search engines your preferred version to index among duplicate pages on the web. It’s supported by several search engines, including Yahoo!, Bing, and Google. The rel=canonical link consolidates indexing properties from the duplicates, like their inbound links, as well as specifies which URL you’d like displayed in search results. However, rel=canonical can be a bit tricky because it’s not very obvious when there’s a misconfiguration.

While the webmaster sees the “red velvet” page on the left in their browser, search engines notice on the webmaster’s unintended “blue velvet” rel=canonical on the right.
We recommend the following best practices for using rel=canonical:
- A large portion of the duplicate page’s content should be present on the canonical version.
- Double-check that your rel=canonical target exists (it’s not an error or “soft 404”)
- Verify the rel=canonical target doesn’t contain a noindex robots meta tag
- Make sure you’d prefer the rel=canonical URL to be displayed in search results (rather than the duplicate URL)
- Include the rel=canonical link in either the <head> of the page or the HTTP header
- Specify no more than one rel=canonical for a page. When more than one is specified, all rel=canonicals will be ignored.
One test is to imagine you don’t understand the language of the content—if you placed the duplicate side-by-side with the canonical, does a very large percentage of the words of the duplicate page appear on the canonical page? If you need to speak the language to understand that the pages are similar; for example, if they’re only topically similar but not extremely close in exact words, the canonical designation might be disregarded by search engines.
Mistake 1: rel=canonical to the first page of a paginated series
Imagine that you have an article that spans several pages:
- example.com/article?story=cupcake-news&page=1
- example.com/article?story=cupcake-news&page=2
- and so on
Specifying a rel=canonical from page 2 (or any later page) to page 1 is not correct use of rel=canonical, as these are not duplicate pages. Using rel=canonical in this instance would result in the content on pages 2 and beyond not being indexed at all.

Good content (e.g., “cookies are superior nutrition” and “to vegetables”) is lost when specifying rel=canonical from component pages to the first page of a series.
In cases of paginated content, we recommend either a rel=canonical from component pages to a single-page version of the article, or to use rel=”prev” and rel=”next” pagination markup.

rel=canonical from component pages to the view-all page

If rel=canonical to a view-all page isn’t designated, paginated content can use rel=”prev” and rel=”next” markup.
Mistake 2: Absolute URLs mistakenly written as relative URLs

The <link> tag, like many HTML tags, accepts both relative and absolute URLs. Relative URLs include a path “relative” to the current page. For example, “images/cupcake.png” means “from the current directory go to the “images” subdirectory, then to cupcake.png.” Absolute URLs specify the full path—including the scheme like http://.
Specifying <link rel=canonical href=“example.com/cupcake.html” /> (a relative URL since there’s no “http://”) implies that the desired canonical URL is http://example.com/example.com/cupcake.html even though that is almost certainly not what was intended. In these cases, our algorithms may ignore the specified rel=canonical. Ultimately this means that whatever you had hoped to accomplish with this rel=canonical will not come to fruition.
Mistake 3: Unintended or multiple declarations of rel=canonical
Occasionally, we see rel=canonical designations that we believe are unintentional. In very rare circumstances we see simple typos, but more commonly a busy webmaster copies a page template without thinking to change the target of the rel=canonical. Now the site owner’s pages specify a rel=canonical to the template author’s site.

If you use a template, check that you didn’t also copy the rel=canonical specification.
Another issue is when pages include multiple rel=canonical links to different URLs. This happens frequently in conjunction with SEO plugins that often insert a default rel=canonical link, possibly unbeknownst to the webmaster who installed the plugin. In cases of multiple declarations of rel=canonical, Google will likely ignore all the rel=canonical hints. Any benefit that a legitimate rel=canonical might have offered will be lost.
In both these types of cases, double-checking the page’s source code will help correct the issue. Be sure to check the entire <head> section as the rel=canonical links may be spread apart.

Check the behavior of plugins by looking at the page’s source code.
Mistake 4: Category or landing page specifies rel=canonical to a featured article
Let’s say you run a site about desserts. Your dessert site has useful category pages like “pastry” and “gelato.” Each day the category pages feature a unique article. For instance, your pastry landing page might feature “red velvet cupcakes.” Because the “pastry” category page has nearly all the same content as the “red velvet cupcake” page, you add a rel=canonical from the category page to the featured individual article.
If we were to accept this rel=canonical, then your pastry category page would not appear in search results. That’s because the rel=canonical signals that you would prefer search engines display the canonical URL in place of the duplicate. However, if you want users to be able to find both the category page and featured article, it’s best to only have a self-referential rel=canonical on the category page, or none at all.

Remember that the canonical designation also implies the preferred display URL. Avoid adding a rel=canonical from a category or landing page to a featured article.
Mistake 5: rel=canonical in the <body>
The rel=canonical link tag should only appear in the <head> of an HTML document. Additionally, to avoid HTML parsing issues, it’s good to include the rel=canonical as early as possible in the <head>. When we encounter a rel=canonical designation in the <body>, it’s disregarded.
This is an easy mistake to correct. Simply double-check that your rel=canonical links are always in the <head> of your page, and as early as possible if you can.

rel=canonical designations in the <head> are processed, not the <body>.
Conclusion
To create valuable rel=canonical designations:
- Verify that most of the main text content of a duplicate page also appears in the canonical page.
- Check that rel=canonical is only specified once (if at all) and in the <head> of the page.
- Check that rel=canonical points to an existent URL with good content (i.e., not a 404, or worse, a soft 404).
- Avoid specifying rel=canonical from landing or category pages to featured articles as that will make the featured article the preferred URL in search results.
And, as always, please ask any questions in our Webmaster Help forum.
Written by Allan Scott, Software Engineer, Indexing Team
The Webmaster Academy goes international
Webmaster level: All
Since we launched the Webmaster Academy in English back in May 2012, its educational content has been viewed well over 1 million times.
The Webmaster Academy was built to guide webmasters in creating great sites that perform well in Google search results. It is an ideal guide for beginner webmasters but also a recommended read for experienced users who wish to learn more about advanced topics.
To support webmasters across the globe, we’re happy to announce that we’re launching the Webmaster Academy in 20 languages. So whether you speak Japanese or Italian, we hope we can help you to make even better websites! You can easily access it through Webmaster Central.
We’d love to read your comments here and invite you to join the discussion in the help forums.
Posted by Giacomo Gnecchi Ruscone, Search Quality
A new opt-out tool
Webmasters have several ways to keep their sites’ content out of Google’s search results. Today, as promised, we’re providing a way for websites to opt out of having their content that Google has crawled appear on Google Shopping, Advisor, Flights, Ho…
Easier management of website verifications
Webmaster level: All
To help webmasters manage the verified owners for their websites in Webmaster Tools, we’ve recently introduced three new features:
-
Verification details view: You can now see the methods used to verify an owner for your site. In the Manage owners page for your site, you can now find the new Verification details link. This screenshot shows the verification details of a user who is verified using both an HTML file uploaded to the site and a meta tag:

Where appropriate, the Verification details will have links to the correct URL on your site where the verification can be found to help you find it faster.
-
Requiring the verification method be removed from the site before unverifying an owner: You now need to remove the verification method from your site before unverifying an owner from Webmaster Tools. Webmaster Tools now checks the method that the owner used to verify ownership of the site, and will show an error message if the verification is still found. For example, this is the error message shown when an unverification was attempted while the DNS CNAME verification method was still found on the DNS records of the domain:

-
Shorter CNAME verification string: We’ve slightly modified the CNAME verification string to make it shorter to support a larger number of DNS providers. Some systems limit the number of characters that can be used in DNS records, which meant that some users were not able to use the CNAME verification method. We’ve now made the CNAME verification method have a fewer number of characters. Existing CNAME verifications will continue to be valid.


We hope this changes make it easier for you to use Webmaster Tools. As always, please post in our Verification forum if you have any questions or feedback.
Posted by Pierre Far, Webmaster Trends Analyst