Announcing domain-wide data in Search Console
Google recommends verifying all versions of a website — http, https, www, and non-www — in order to get the most comprehensive view of your site in Google Search Console. Unfortunately, many separate listings can make it hard for webmasters to understand the full picture of how Google “sees” their domain as a whole. To make this easier, today we’re announcing “domain properties” in Search Console, a way of verifying and seeing the data from Google Search for a whole domain.

Domain properties show data for all URLs under the domain name, including all protocols, subdomains, and paths. They give you a complete view of your website across Search Console, reducing the need to manually combine data. So regardless of whether you use m-dot URLs for mobile pages, or are (finally) getting the migration to HTTPS set up, Search Console will be able to help with a complete view of your site’s data with regards to how Google Search sees it.
If you already have DNS verification set up, Search Console will automatically create new domain properties for you over the next few weeks, with data over all reports. Otherwise, to add a new domain property, go to the property selector, add a new domain property, and use DNS verification.We recommend using domain properties where possible going forward.
Domain properties were built based on your feedback; thank you again for everything you’ve sent our way over the years! We hope this makes it easier to manage your site, and to get a complete overview without having to manually combine data. Should you have any questions, feel free to drop by our help forums, or leave us a comment on Twitter. And as always, you can also use the feedback feature built in to Search Console as well.
Posted by Erez Bixon, Search Console Team

Announcing domain-wide data in Search Console
Google recommends verifying all versions of a website — http, https, www, and non-www — in order to get the most comprehensive view of your site in Google Search Console. Unfortunately, many separate listings can make it hard for webmasters to understand the full picture of how Google “sees” their domain as a whole. To make this easier, today we’re announcing “domain properties” in Search Console, a way of verifying and seeing the data from Google Search for a whole domain.
Domain properties show data for all URLs under the domain name, including all protocols, subdomains, and paths. They give you a complete view of your website across Search Console, reducing the need to manually combine data. So regardless of whether you use m-dot URLs for mobile pages, or are (finally) getting the migration to HTTPS set up, Search Console will be able to help with a complete view of your site’s data with regards to how Google Search sees it.
If you already have DNS verification set up, Search Console will automatically create new domain properties for you over the next few weeks, with data over all reports. Otherwise, to add a new domain property, go to the property selector, add a new domain property, and use DNS verification.We recommend using domain properties where possible going forward.
Domain properties were built based on your feedback; thank you again for everything you’ve sent our way over the years! We hope this makes it easier to manage your site, and to get a complete overview without having to manually combine data. Should you have any questions, feel free to drop by our help forums, or leave us a comment on Twitter. And as always, you can also use the feedback feature built in to Search Console as well.
Posted by Erez Bixon, Search Console Team
Tie your sites together with property sets in Search Console
Mobile app, mobile website, desktop website — how do you track their combined visibility in search? Until now, you’ve had to track all of these statistics separately. Search Console is introducing the concept of “property sets,” which let you combine …
The four steps to appiness
Webmaster Level: intermediate to advanced
App deep links are the new kid on the block in organic search, and they’re picking up speed faster than you can say “schema.org ViewAction”! For signed-in users, 15% of Google searches on Android now return deep links to apps through App Indexing. And over just the past quarter, we’ve seen the number of clicks on app deep links jump by 10x.
We’ve gotten a lot of feedback from developers and seen a lot of implementations gone right and others that were good learning experiences since we opened up App Indexing back in June. We’d like to share with you four key steps to monitor app performance and drive user engagement:
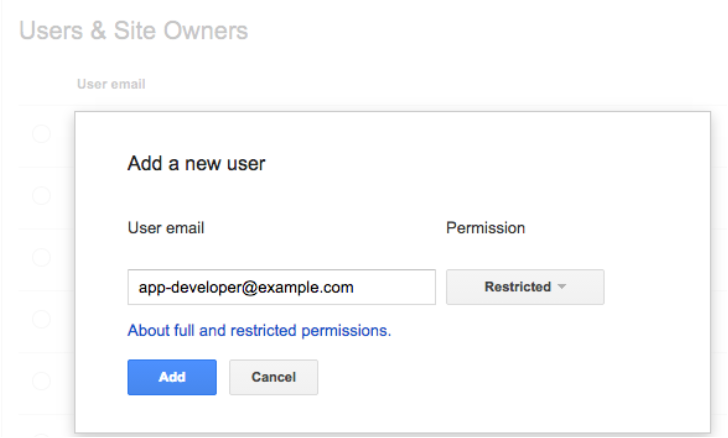
1. Give your app developer access to Webmaster Tools
App indexing is a team effort between you (as a webmaster) and your app development team. We show information in Webmaster Tools that is key for your app developers to do their job well. Here’s what’s available right now:
- Errors in indexed pages within apps
- Weekly clicks and impressions from app deep link via Google search
- Stats on your sitemap (if that’s how you implemented the app deep links)
…and we plan to add a lot more in the coming months!
We’ve noticed that very few developers have access to Webmaster Tools. So if you want your app development team to get all of the information they need to fix app-related issues, it’s essential for them to have access to Webmaster Tools.
Any verified site owner can add a new user. Pick restricted or full permissions, depending on the level of access you’d like to give:
2. Understand how your app is doing in search results
How are users engaging with your app from search results? We’ve introduced two new ways for you to track performance for your app deep links:
- We now send a weekly clicks and impressions update to the Message center in your Webmaster Tools account.
- You can now track how much traffic app deep links drive to your app using referrer information – specifically, the referrer extra in the ACTION_VIEW intent. We’re working to integrate this information with Google Analytics for even easier access. Learn how to track referrer information on our Developer site.
3. Make sure key app resources can be crawled
Blocked resources are one of the top reasons for the “content mismatch” errors you see in Webmaster Tools’ Crawl Errors report. We need access to all the resources necessary to render your app page. This allows us to assess whether your associated web page has the same content as your app page.
To help you find and fix these issues, we now show you the specific resources we can’t access that are critical for rendering your app page. If you see a content mismatch error for your app, look out for the list of blocked resources in “Step 5” of the details dialog:

4. Watch out for Android App errors
To help you identify errors when indexing your app, we’ll send you messages for all app errors we detect, and will also display most of them in the “Android apps” tab of the Crawl errors report.
In addition to the currently available “Content mismatch” and “Intent URI not supported” error alerts, we’re introducing three new error types:
- APK not found: we can’t find the package corresponding to the app.
- No first-click free: the link to your app does not lead directly to the content, but requires login to access.
- Back button violation: after following the link to your app, the back button did not return to search results.
In our experience, the majority of errors are usually caused by a general setting in your app (e.g. a blocked resource, or a region picker that pops up when the user tries to open the app from search). Taking care of that generally resolves it for all involved URIs.
Good luck in the pursuit of appiness! As always, if you have questions, feel free to drop by our Webmaster help forum.
Posted by Mariya Moeva, Webmaster Trends Analyst
More Precise Index Status Data for Your Site Variations
Webmaster Level: Intermediate

The Google Webmaster Tools Index Status feature reports how many pages on your site are indexed by Google. In the past, we didn’t show index status data for HTTPS websites independently, but rather we’d included everything in the HTTP site’s report. In the last months, we’ve heard from you that you’d like to use Webmaster Tools to track your indexed URLs for sections of your website, including the parts that use HTTPS.
We’ve seen that nearly 10% of all URLs already use a secure connection to transfer data via HTTPS, and we hope to see more webmasters move their websites from HTTP to HTTPS in the future. We’re happy to announce a refinement in the way your site’s index status data is displayed in Webmaster Tools: the Index Status feature now tracks your site’s indexed URLs for each protocol (HTTP and HTTPS) as well as for verified subdirectories.
This makes it easy for you to monitor different sections of your site. For example, the following URLs each show their own data in Webmaster Tools Index Status report, provided they are verified separately:
|
HTTP
|
HTTPS
|
The refined data will be visible for webmasters whose site’s URLs are on HTTPS or who have subdirectories verified, such as https://example.com/folder/. Data for subdirectories will be included in the higher-level verified sites on the same hostname and protocol.
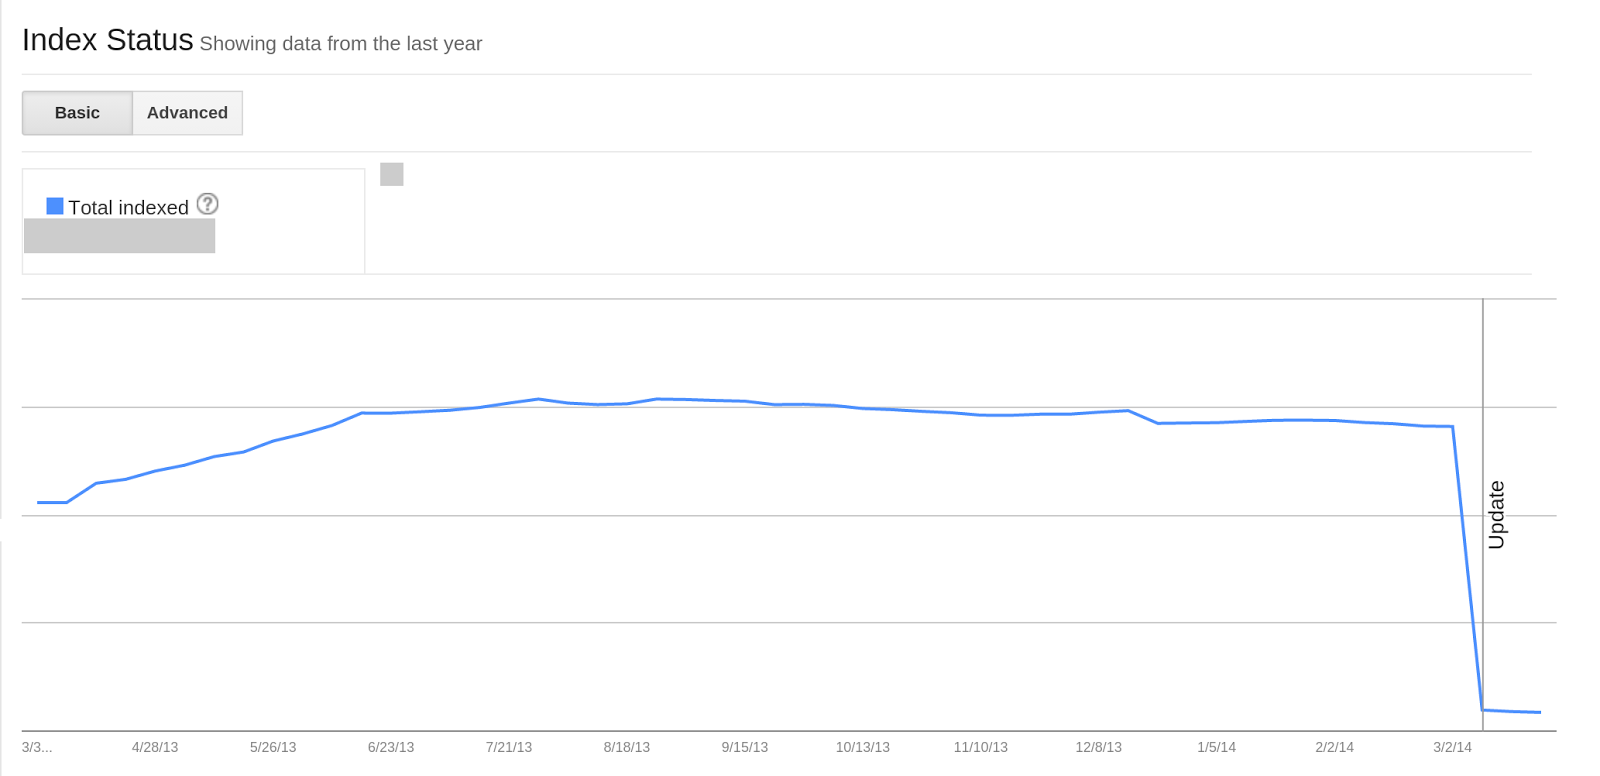
If you have a website on HTTPS or if some of your content is indexed under different subdomains, you will see a change in the corresponding Index Status reports. The screenshots below illustrate the changes that you may see on your HTTP and HTTPS sites’ Index Status graphs for instance:
HTTP site’s Index Status showing drop
HTTPS site’s Index Status showing increase
An “Update” annotation has been added to the Index Status graph for March 9th, showing when we started collecting this data. This change does not affect the way we index your URLs, nor does it have an impact on the overall number of URLs indexed on your domain. It is a change that only affects the reporting of data in Webmaster Tools user interface.
In order to see your data correctly, you will need to verify all existing variants of your site (www., non-www., HTTPS, subdirectories, subdomains) in Google Webmaster Tools. We recommend that your preferred domains and canonical URLs are configured accordingly.
Note that if you wish to submit a Sitemap, you will need to do so for the preferred variant of your website, using the corresponding URLs. Robots.txt files are also read separately for each protocol and hostname.
We hope that you’ll find this update useful, and that it’ll help you monitor, identify and fix indexing problems with your website. You can find additional details in our Index Status Help Center article. As usual, if you have any questions, don’t hesitate to ask in our webmaster Help Forum.
Posted by Zineb Ait Bahajji, WTA, thanks to the Webmaster Tools team.
Google Publisher Plugin beta: Bringing our publisher products to WordPress
Cross-posted from the Inside AdSense blog.
We’ve heard from many publishers using WordPress that they’re looking for an easier way to work with Google products within the platform. Today, we’re excited to share the beta release of our official Google Publisher Plugin, which adds new functionality to publishers’ WordPress websites. If you own your own domain and power it with WordPress, this new plugin will give you access to a few Google services — and all within WordPress.
Please keep in mind that because this is a beta release, we’re still fine-tuning the plugin to make sure it works well on the many WordPress sites out there. We’d love for you to try it now and share your feedback on how it works for your site.
This first version of the Google Publisher Plugin currently supports two Google products:
- Google AdSense: Earn money by placing ads on your website. The plugin links your WordPress site to your AdSense account and makes it easier to place ads on your site — without needing to manually modify any HTML code.
- Google Webmaster Tools: Webmaster Tools provides you with detailed reports about your pages’ visibility on Google. The plugin allows you to verify your site on Webmaster Tools with just one click.
Visit the WordPress.org plugin directory to download the new plugin and give it a try. For more information about the plugin and how to use it, please visit our Help Center. We look forward to hearing your feedback!
Posted by Michael Smith – Product Manager
Switching to the new website verification API
Webmaster level: advanced Just over a year ago we introduced a new API for website verification for Google services. In the spirit of keeping things simple and focusing our efforts, we’ve decided to deprecate the old verification API method on Match 31…
Verify your site in Webmaster Tools using Google Tag Manager
Webmaster level: Intermediate
If you use Google Tag Manager to add and update your site tags, now you can quickly and easily verify ownership of your site in Webmaster Tools using the container snippet code.
Here’s how it’s done:
1. On the Webmaster Tools home page, click Manage site for the site you’d like to verify, then select Verify this site. If you haven’t added the site yet, you can click the Add a site button in the top right corner.

To do this, you must have “View, Edit, and Manage” account level permissions in Google Tag Manager.
2. On the Verification page, select Google Tag Manager as the verification method and follow the steps on your screen.

3. Click Verify.
And you’re done!
If you’ve got any questions about this verification method, drop by the Webmaster Help Forum.
Posted by Mariya Moeva, Webmaster Trends Analyst