Make the most of Search Queries in Webmaster Tools
Level: Beginner to Intermediate
If you’re intrigued by the Search Queries feature in Webmaster Tools but aren’t sure how to make it actionable, we have a video that we hope will help!
Maile shares her approach to Search Queries in Webmaster Tools
This video explains the vocabulary of Search Queries, such as:
- Impressions
- Average position (only the top-ranking URL for the user’s query is factored in our calculation)
- Click
- CTR
The video also reviews an approach to investigating Top queries and Top pages:
- Prepare by understanding your website’s goals and your target audience (then using Search Queries “filters” to support your knowledge)
- Sort by clicks in Top queries to understand the top queries bringing searchers to your site (for the given time period)
- Sort by CTR to notice any missed opportunities
- Categorize queries into logical buckets that simplify tracking your progress and staying in touch with users’ needs
- Sort Top pages by clicks to find the URLs on your site most visited by searchers (for the given time period)
- Sort Top pages by impressions to find valuable pages that can be used to help feature your related, high-quality, but lower-ranking pages
After you’ve watched the video and applied the knowledge of your site with the findings from Search Queries, you’ll likely have several improvement ideas to help searchers find your site. If you’re up for it, let us know in the comments what Search Queries information you find useful (and why!), and of course, as always, feel free to share any tips or feedback.
Written by Maile Ohye, Developer Programs Tech Lead

Webmaster Tools verification strategies
Webmaster level: all
Verifying ownership of your website is the first step towards using Google Webmaster Tools. To help you keep verification simple & reduce its maintenance to a minimum, especially when you have multiple people using Webmaster Tools, we’ve put together a small list of tips & tricks that we’d like to share with you:
- The method that you choose for verification is up to you, and may depend on your CMS & hosting providers. If you want to be sure that changes on your side don’t result in an accidental loss of the verification status, you may even want to consider using two methods in parallel.
- Back in 2009, we updated the format of the verification meta tag and file. If you’re still using the old format, we recommend moving to the newer version. The newer meta tag is called “google-site-verification, and the newer file format contains just one line with the file name. While we’re currently supporting ye olde format, using the newer one ensures that you’re good to go in the future.
- When removing users’ access in Webmaster Tools, remember to remove any active associated verification tokens (file, meta tag, etc.). Leaving them on your server means that these users would be able to gain access again at any time. You can view the site owners list in Webmaster Tools under Configuration / Users.
- If multiple people need to access the site, we recommend using the “add users” functionality in Webmaster Tools. This makes it easier for you to maintain the access control list without having to modify files or settings on your servers.
- Also, if multiple people from your organization need to use Webmaster Tools, it can be a good policy to only allow users with email addresses from your domain. By doing that, you can verify at a glance that only users from your company have access. Additionally, when employees leave, access to Webmaster Tools is automatically taken care of when that account is disabled.
- Consider using “restricted” (read-only) access where possible. Settings generally don’t need to be changed on a daily basis, and when they do need to be changed, it can be easier to document them if they have to go through a central account.
We hope these tips help you to simplify the situation around verification of your website in Webmaster Tools. For more questions about verification, feel free to drop by our Webmaster Help Forums.
Posted by John Mueller, Webmaster Trends Analyst, Zurich
Introducing Data Highlighter for event data
Webmaster Level: All
Update 19 February 2013: Data Highlighter for events structured markup is available in all languages in Webmaster Tools.
At Google we’re making more and more use of structured data to provide enhanced search results, such as rich snippets and event calendars, that help users find your content. Until now, marking up your site’s HTML code has been the only way to indicate structured data to Google. However, we recognize that markup may be hard for some websites to deploy.
Today, we’re offering webmasters a simpler alternative: Data Highlighter. At initial launch, it’s available in English only and for structured data about events, such as concerts, sporting events, exhibitions, shows, and festivals. We’ll make Data Highlighter available for more languages and data types in the months ahead. Update 19 February 2013: Data Highlighter for events structured markup is available in all languages in Webmaster Tools.
Data Highlighter is a point-and-click tool that can be used by anyone authorized for your site in Google Webmaster Tools. No changes to HTML code are required. Instead, you just use your mouse to highlight and “tag” each key piece of data on a typical event page of your website: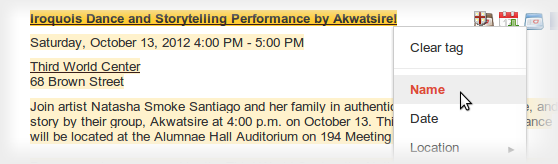
If your page lists multiple events in a consistent format, Data Highlighter will “learn” that format as you apply tags, and help speed your work by automatically suggesting additional tags. Likewise, if you have many pages of events in a consistent format, Data Highlighter will walk you through a process of tagging a few example pages so it can learn about their format variations. Usually, 5 or 10 manually tagged pages are enough for our sophisticated machine-learning algorithms to understand the other, similar pages on your site.
When you’re done, you can review a sample of all the event data that Data Highlighter now understands. If it’s correct, click “Publish.”
From then on, as Google crawls your site, it will recognize your latest event listings and make them eligible for enhanced search results. You can inspect the crawled data on the Structured Data Dashboard, and unpublish at any time if you’re not happy with the results.
Here’s a short video explaining how the process works:
To get started with Data Highlighter, visit Webmaster Tools, select your site, click the “Optimization” link in the left sidebar, and click “Data Highlighter”.
If you have any questions, please read our Help Center article or ask us in the Webmaster Help Forum. Happy Highlighting!
Posted by Justin Boyan, Product Manager
Rich snippets guidelines
Webmaster level: All

Traditional, text-only, search result snippets aim to summarize the content of a page in our search results. Rich snippets (shown above) allow webmasters to help us provide even better summaries using structured data markup that they can add to their pages. Today we’re introducing a set of guidelines to help you implement high quality structured data markup for rich snippets.
Once you’ve correctly added structured data markup to you site, rich snippets are generated algorithmically based on that markup. If the markup on a page offers an accurate description of the page’s content, is up-to-date, and is visible and easily discoverable on your page and by users, our algorithms are more likely to decide to show a rich snippet in Google’s search results.
Alternatively, if the rich snippets markup on a page is spammy, misleading, or otherwise abusive, our algorithms are much more likely to ignore the markup and render a text-only snippet. Keep in mind that, while rich snippets are generated algorithmically, we do reserve the right to take manual action (e.g., disable rich snippets for a specific site) in cases where we see actions that hurt the experience for our users.
To illustrate these guidelines with some examples:
- If your page is about a band, make sure you mark up concerts being performed by that band, not by related bands or bands in the same town.
- If you sell products through your site, make sure reviews on each page are about that page’s product and not the store itself.
- If your site provides song lyrics, make sure reviews are about the quality of the lyrics, not the quality of the song itself.
In addition to the general rich snippets quality guidelines we’re publishing today, you’ll find usage guidelines for specific types of rich snippets in our Help Center. As always, if you have any questions or feedback, please tell us in the Webmaster Help Forum.
Posted by Jeremy Lubin, Consumer Experience Specialist, & Pierre Far, Webmaster Trends Analyst
Keeping you informed of critical website issues
Webmaster level: All
Having a healthy and well-performing website is important, both to you as the webmaster and to your users. When we discover critical issues with a website, Webmaster Tools will now let you know by automatically sending an email with more information.
We’ll only notify you about issues that we think
have significant impact on your site’s health or search performance and
which have clear actions that you can take to address the issue. For
example, we’ll email you if we detect malware on your site or see a
significant increase in errors while crawling your site.
For most sites these kinds of issues will occur
rarely. If your site does happen to have an issue, we cap the number of
emails we send over a certain period of time to avoid flooding your inbox.
If you don’t want to receive any email from Webmaster Tools you can
change your email delivery
preferences.
We hope that you find this change a useful way to
stay up-to-date on critical and important issues regarding your site’s
health. If you
have any questions, please let us know via our
Webmaster
Help Forum.
Posted by John Mueller, Webmaster Trends Analyst, Google Zürich
Structured Data Testing Tool
Webmaster level: All
Today we’re excited to share the launch of a shiny new version of the rich snippet testing tool, now called the structured data testing tool. The major improvements are:
Today we’re excited to share the launch of a shiny new version of the rich snippet testing tool, now called the structured data testing tool. The major improvements are:
- We’ve improved how we display rich snippets in the testing tool to better match how they appear in search results.
- The brand new visual design makes it clearer what structured data we can extract from the page, and how that may be shown in our search results.
- The tool is now available in languages other than English to help webmasters from around the world build structured-data-enabled websites.
Here’s what it looks like:
The new structured data testing tool works with all supported rich snippets and authorship markup, including applications, products, recipes, reviews, and others.
Try it yourself and, as always, if you have any questions or feedback, please tell us in the Webmaster Help Forum.
Written by Yong Zhu on behalf of the rich snippets testing tool team

Answering the top questions from government webmasters
Webmaster level: Beginner – Intermediate
Government sites, from city to state to federal agencies, are extremely important to Google Search. For one thing, governments have a lot of content — and government websites are often the canonical source of information that’s important to citizens. Around 20 percent of Google searches are for local information, and local governments are experts in their communities.
That’s why I’ve spoken at the National Association of Government Webmasters (NAGW) national conference for the past few years. It’s always interesting speaking to webmasters about search, but the people running government websites have particular concerns and questions. Since some questions come up frequently I thought I’d share this FAQ for government websites.
Question 1: How do I fix an incorrect phone number or address in search results or Google Maps?
Although managing their agency’s site is plenty of work, government webmasters are often called upon to fix problems found elsewhere on the web too. By far the most common question I’ve taken is about fixing addresses and phone numbers in search results. In this case, government site owners really can do it themselves, by claiming their Google+ Local listing. Incorrect or missing phone numbers, addresses, and other information can be fixed by claiming the listing.
Most locations in Google Maps have a Google+ Local listing — businesses, offices, parks, landmarks, etc. I like to use the San Francisco Main Library as an example: it has contact info, detailed information like the hours they’re open, user reviews and fun extras like photos. When we think users are searching for libraries in San Francisco, we may display a map and a listing so they can find the library as quickly as possible.
If you work for a government agency and want to claim a listing, we recommend using a shared Google Account with an email address at your .gov domain if possible. Usually, ownership of the page is confirmed via a phone call or post card.
Question 2: I’ve claimed the listing for our office, but I have 43 different city parks to claim in Google Maps, and none of them have phones or mailboxes. How do I claim them?
Use the bulk uploader! If you have 10 or more listings / addresses to claim at the same time, you can upload a specially-formatted spreadsheet. Go to www.google.com/places/, click the “Get started now” button, and then look for the “bulk upload” link.
If you run into any issues, use the Verification Troubleshooter.
Question 3: We’re moving from a .gov domain to a new .com domain. How should we move the site?
We have a Help Center article with more details, but the basic process involves the following steps:
- Make sure you have both the old and new domain verified in the same Webmaster Tools account.
- Use a 301 redirect on all pages to tell search engines your site has moved permanently.
- Don’t do a single redirect from all pages to your new home page — this gives a bad user experience.
- If there’s no 1:1 match between pages on your old site and your new site (recommended), try to redirect to a new page with similar content.
- If you can’t do redirects, consider cross-domain canonical links.
- Make sure to check if the new location is crawlable by Googlebot using the Fetch as Google feature in Webmaster Tools.
- Use the Change of Address tool in Webmaster Tools to notify Google of your site’s move.
- Have a look at the Links to Your Site in Webmaster Tools and inform the important sites that link to your content about your new location.
- We recommend not implementing other major changes at the same time, like large-scale content, URL structure, or navigational updates.
- To help Google pick up new URLs faster, use the Fetch as Google tool to ask Google to crawl your new site, and submit a Sitemap listing the URLs on your new site.
- To prevent confusion, it’s best to retain control of your old site’s domain and keep redirects in place for as long as possible — at least 180 days.
What if you’re moving just part of the site? This question came up too — for example, a city might move its “Tourism and Visitor Info” section to its own domain.
In that case, many of the same steps apply: verify both sites in Webmaster Tools, use 301 redirects, clean up old links, etc. In this case you don’t need to use the Change of Address form in Webmaster Tools since only part of your site is moving. If for some reason you’ll have some of the same content on both sites, you may want to include a cross-domain canonical link pointing to the preferred domain.
Question 4: We’ve done a ton of work to create unique titles and descriptions for pages. How do we get Google to pick them up?
First off, that’s great! Better titles and descriptions help users decide to click through to get the information they need on your page. The government webmasters I’ve spoken with care a lot about the content and organization of their sites, and work hard to provide informative text for users.
Google’s generation of page titles and descriptions (or “snippets”) is completely automated and takes into account both the content of a page as well as references to it that appear on the web. Changes are picked up as we recrawl your site. But you can do two things to let us know about URLs that have changed:
- Submit an updated XML Sitemap so we know about all of the pages on your site.
- In Webmaster Tools, use the Fetch as Google feature on a URL you’ve updated. Then you can choose to submit it to the index.
- You can choose to submit all of the linked pages as well — if you’ve updated an entire section of your site, you might want to submit the main page or an index page for that section to let us know about a broad collection of URLs.
Question 5: How do I get into the YouTube government partner program?
For this question, I have bad news, good news, and then even better news. On the one hand, the government partner program has been discontinued. But don’t worry, because most of the features of the program are now available to your regular YouTube account. For example, you can now upload videos longer than 10 minutes.
Did I say I had even better news? YouTube has added a lot of functionality useful for governments in the past year:
- You can now broadcast live streaming video to YouTube via Hangouts On Air (requires a Google+ account).
- You can link your YouTube account with your Webmaster Tools account, making it the “official channel” for your site.
- Automatic captions continue to get better and better, supporting more languages.
I hope this FAQ has been helpful, but I’m sure I haven’t covered everything government webmasters want to know. I highly recommend our Webmaster Academy, where you can learn all about making your site search-engine friendly. If you have a specific question, please feel free to add a question in the comments or visit our really helpful Webmaster Central Forum.
Posted by Jason Morrison, Search Quality Team
Site Errors Breakdown
Webmaster level: All
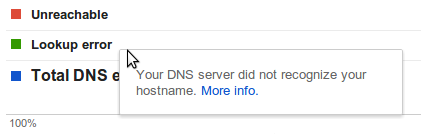
Today we’re announcing more detailed Site Error information in Webmaster Tools. This information is useful when looking for the source of your Site Errors. For example, if your site suffers from server connectivity problems, your server may simply be misconfigured; then again, it could also be completely unavailable! Since each Site Error (DNS, Server Connectivity, and Robots.txt Fetch) is comprised of several unique issues, we’ve broken down each category into more specific errors to provide you with a better analysis of your site’s health.
Site Errors will display statistics for each of your site-wide crawl errors from the past 90 days. In addition, it will show the failure rates for any category-specific errors that have been affecting your site.

If you’re not sure what a particular error means, you can read a short description of it by hovering over its entry in the legend. You can find more detailed information by following the “More info” link in the tooltip.
We hope that these changes will make Site Errors even more informative and helpful in keeping your site in tip-top shape. If you have any questions or suggestions, please let us know through the Webmaster Tools Help Forum.
Written by Cesar Cuenca and Tiffany Wang, Webmaster Tools Interns
Configuring URL Parameters in Webmaster Tools
Webmaster Level: Intermediate to Advanced
We recently filmed a video (with slides available) to provide more information about the URL Parameters feature in Webmaster Tools. The URL Parameters feature is designed for webmasters who want to help Google crawl their site more efficiently, and who manage a site with — you guessed it — URL parameters! To be eligible for this feature, the URL parameters must be configured in key/value pairs like item=swedish-fish or category=gummy-candy in the URL http://www.example.com/product.php?item=swedish-fish&category=gummy-candy.
Guidance for common cases when configuring URL Parameters. Music in the background masks the ongoing pounding of my neighbor’s construction!
URL Parameter settings are powerful. By telling us how your parameters behave and the recommended action for Googlebot, you can improve your site’s crawl efficiency. On the other hand, if configured incorrectly, you may accidentally recommend that Google ignore important pages, resulting in those pages no longer being available in search results. (There’s an example provided in our improved Help Center article.) So please take care when adjusting URL Parameters settings, and be sure that the actions you recommend for Googlebot make sense across your entire site.
Written by Maile Ohye, Developer Programs Tech Lead