Prerequisite: Setting Up Google Search Console API Access
Before features in the Hobo SEO Dashboard that interact with Google Search Console (such as automatically adding clients, fetching performance data, or checking property types) can function, you must enable the necessary APIS and link your Apps Script project to a Google Cloud Platform (GCP) project. Whilst the linked article provides full details, the basic steps involve:
1. Create or Select a GCP Project
Go to the Google Cloud Console and create a new project or select an existing one.
2. Enable APIS
Within your GCP project, navigate to APIS & Services > Library and enable the Google Search Console API. Ensure the Google Drive API and Google Sheets API are also enabled (these are often enabled by default for Apps Script).
3. Configure OAuth Consent Screen
Go to APIS & Services > OAuth consent screen. Configure it (User Type, App Name, Support Email, Developer Contact). Add the necessary scopes required by the script (the script will usually prompt for these during authorisation, but common ones include webmasters.readonly, drive, spreadsheets, script.external_request, userinfo.email, script.scriptapp).
4. Link GCP Project to Apps Script
In the Google Apps Script editor for your spreadsheet, go to Project Settings (the gear icon ⚙️). Scroll down to the Google Cloud Platform (GCP) Project section and enter the Project Number of the GCP project you configured. Click Set Project.
(Refer to the full guide on how to set up Google Search Console API for detailed instructions and screenshots.)
Hobo SEO Dashboard: Usage Tips
NOTE: The first time you run Hobo SEO Dashboard, you will be asked to authorise it. Hobo SEO Dashboard is designed to be PRIVATE.
A compilation of usage tips based on the Hobo SEO Dashboard menu structure and associated functions:
Primary Functionality
The Hobo SEO Dashboard is designed to run automatically and autonomously. You can turn it on, it will take about an hour to set itself up. Once activated, it will start to produce reports for every account in your Search Console. Note, it does not email until you specifically set it up to email.
When Report Scheduler is set to Activate Automated Reporting, all the functionality below runs automatically over the course of the day, all within your API limits.
It is designed to be very frugal, work on a Personal Gmail workspace and stay well within Google’s free API thresholds.
Tip 1: Turn ON Automated Reporting
When you select this, it takes 30 minutes to initialise. When this option is selected, a series of scripts will run for 6 minutes to set the initialisation phase up and prepare your sheet for reporting.
- Click on Hobo Admin
- Hover over Report Scheduler
- Click on Activate Automated Reporting
NOTE: When Automatic Reporting is turned on, this function will periodically stop and start the reporter to perform its functions on any client report.
Tip 2: Turn OFF Automated Reporting
This completely stops the Hobo SEO Dashboard from performing any functions.
- Click on Hobo Admin
- Hover over Report Scheduler
- Click on Deactivate Automated Reporting
When Deactivate Automated Reporting is selected, the reporter disables any set triggers and is now completely dormant.
Note, you can turn this on and off at your leisure, but note that each time you do, it will cause an iteration of multiple scripts.
TIP: Turn off the automation every now and then and reinitialise the reporter so the system will optimise itself. Select Activate Automated Reporting to update to the latest version if another version is available. (Beta)
Tip 3: Manually Start the Reporter
By Default, it is set to STARTED.
- Click on Hobo Controls
- Click on Start Reporter
Tip 4: Manually Stop the Reporter
You can stop the reporter at any time. NOTE – When the reporter is stopped, and automatic reporting is set to ON, the reporter will initiate itself again to begin running reports. To turn off the autonomous agent, select tip 2 – Deactivate Automatic Reporting to completely stop the reporter. You can turn it on and off when you choose. It is designed to run continuously.
- Click on Hobo Controls
- Click on Stop Reporter
Tip 5: Manually Update Search Console Data
- Click on Hobo Controls
- Hover over Dashboard
- Click on Update Dashboard Search Console Report
Tip 6: Manually Update Screaming Frog Crawl Data
- Click on Hobo Controls
- Hover over Dashboard
- Click on Update Dashboard Crawl Report
Tip 7: Load the Next Client in the Queue
This runs automatically every hour or so. The optimal runtime for this is every hour. Use Select Client to browse your sites instead, for quick access.
- Click on Hobo Controls
- Click on Load Next Client
CRITICAL NOTE: When Load Next Client is selected, it triggers a series of cleanup functions on your sheet and reinitializations that take ten minutes to complete on occasion. When loading and cleaning, the reporter will go into RESETTING mode, and no reports will run until this process is complete, and scheduling takes over again, if you have Activate Automated Reporting selected.
Tip 8: Select a Specific Client to Load
At any time, you can select a new client to load, and the report will reset itself. If left, the Dashboard will prepare a report for that client.
- Click on Hobo Controls
- Click on Select Client
- Use the sidebar to choose the desired client.
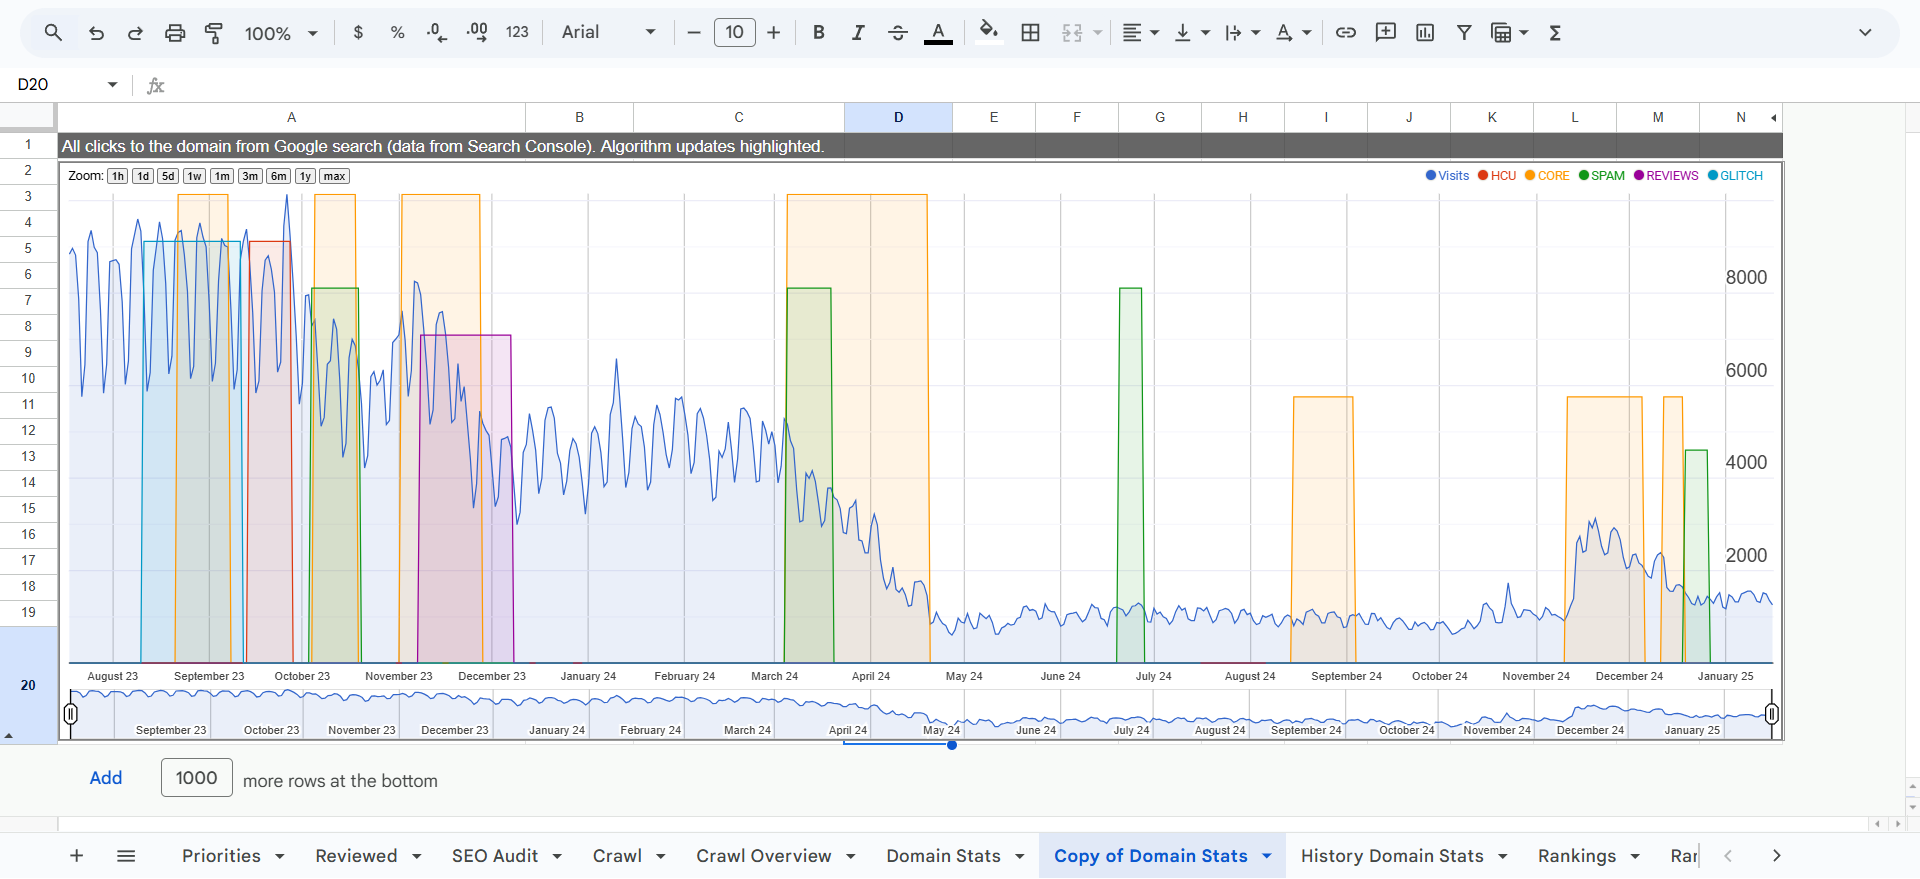
Selecting a new client takes you to the Domain Stats tab in the Hobo SEO Dashboard, where you can browse algorithmic impacts for a year. Historic Domain stats are in beta.
Tip 9: Reset the Dashboard for a New Client/Report
The reset functionality takes 5 minutes to completely reset, sometimes longer. This is to ensure the Dashboard is completely cleaned of previous report data. While the reset is underway, the report will pause its functionality and automatically restart when ready.
- Click on Hobo Controls
- Click on Reset Report
Tip 10: Add a New Client Manually (SF Focus)
- Click on Hobo Controls
- Hover over Crawl
- Click on Add New SF Client
- Fill in the details in the sidebar.
Tip 11: Publish the Current Client’s Report
This will publish the contents of the currently loaded Dashboard report to a new Google Sheet (the Client Report). If a report has been previously generated, it will update that report.
To successfully publish a client report, the reporter must have processed Search Console and crawl reports (see Tip 5 and Tip 6 above). If you do not have Screaming Frog, it will skip this and prepare Search Console data.
- Click on Hobo Admin
- Hover over Client Report
- Click on Publish Client Report
Tip 12: Archive Inactive Clients
In your Clients tab in Hobo SEO Dashboard, or your Clients Archiver tab, row 111, select YES to archive any site. If you delete a site from your tab, it will be pulled back into the sheet when the sheet automatically imports your list of Search Console sites. This is why Dashboard archives clients. Sites archived will move to the Clients Archiver tab to the other. Note: To delete a client, simply delete the column in the Clients tab.
- Click on Hobo Admin
- Hover over Setup
- Click on Archive Clients
Tip 13: Unarchive Clients
In your Clients Archiver tab, row 111, select NO to unarchive any site. Sites unarchived will move from the Clients Archiver sheet to the Clients tab. Note: To delete a client, simply delete the column in the Clients tab.
- Click on Hobo Admin
- Hover over Setup
- Click on Unarchive Clients
Tip 14: Automatically Add Clients from GSC
This will sync your clients from Search Console. Note, this is done automatically by the system every 4 hours. Note that this is time-consuming and resource-intensive when selected manually.
- Click on Hobo Admin
- Hover over Setup
- Click on Import Search Console Clients
Tip 15: Automatically Add Clients from SF Files
If you have Screaming Frog data files in your Google Drive, this will create clients in your Hobo SEO Dashboard based on the websites you have crawled. Note, this is automatically done by the system, too.
- Click on Hobo Controls
- Hover over Crawl
- Click on Auto Add Clients from Google Drive
Tip 16: Access Training Material
- Click on Hobo Admin
- Click on Training Module
Tip 17: Manually Import a Specific Screaming Frog Report File
- Click on Hobo Controls
- Hover over Crawl
- Hover over Import File Individually to Tab
- Select the specific report type (e.g., Check for Missing H1 Tags)
Tip 18: Set or Update Your Admin/Company Details
- Click on Hobo Admin
- Click on Set Admin
- Fill in the sidebar details.
Tip 19: Manually Prioritise Client Reporting Order
- Click on Hobo Admin
- Hover over Setup
- Click on Optimise Crawl Reporting
Tip 20: Manually Sort the ‘Crawl’ Tab by Issue Priority
- Click on Hobo Controls
- Hover over Crawl
- Hover over Import File Individually to Tab
- Click on Sort Crawl By Colour
Tip 21: Generate the Crawl Schedule
- Click on Hobo Controls
- Hover over Crawl
- Click on Get Crawl Schedule
Tip 22: Update Google Algorithm Dates in Settings
- Click on Hobo Controls
- Hover over Search Console
- Click on Update Google Algorithm Dates
Tip 23: Activate the “Winners and Losers URLS” Project
- Click on Hobo Admin
- Hover over Projects > Winners and Losers URLS
- Click on Activate URLS, Winners and Losers Project
Tip 24: Activate the “Winners and Losers Keywords” Project
- Click on Hobo Admin
- Hover over Projects > Winners and Losers Keywords
- Click on Activate Keywords Winners and Losers Project
Tip 25: Manually Analyse Dead Pages
- Click on Hobo Controls
- Hover over Crawl > Import File Individually to Tab
- Click on Analyse Dead Pages
Tip 26: Manually Get the Main Crawl File
- Click on Hobo Controls
- Hover over Crawl > Import File Individually to Tab
- Click on Get Crawl Files
Tip 27: View Upgrade/Offer Information
- Click on Upgrade
- Click on Upgrade to Hobo SEO Dashboard
Tip 28: Deactivate the “Winners and Losers URLS” Project
- Click on Hobo Admin
- Hover over Projects > Winners and Losers URLS
- Click on Deactivate URL,S Winners and Losers Project
Tip 29: Deactivate the “Winners and Losers Keywords” Project
- Click on Hobo Admin
- Hover over Projects > Winners and Losers Keywords
- Click on Deactivate Keywords, Winners and Losers Project
Email-Related Functions
Tip 30: Prepare an Email to the Current Client
- Click on Hobo Admin
- Hover over Client Report
- Click on Prepare Email To Client
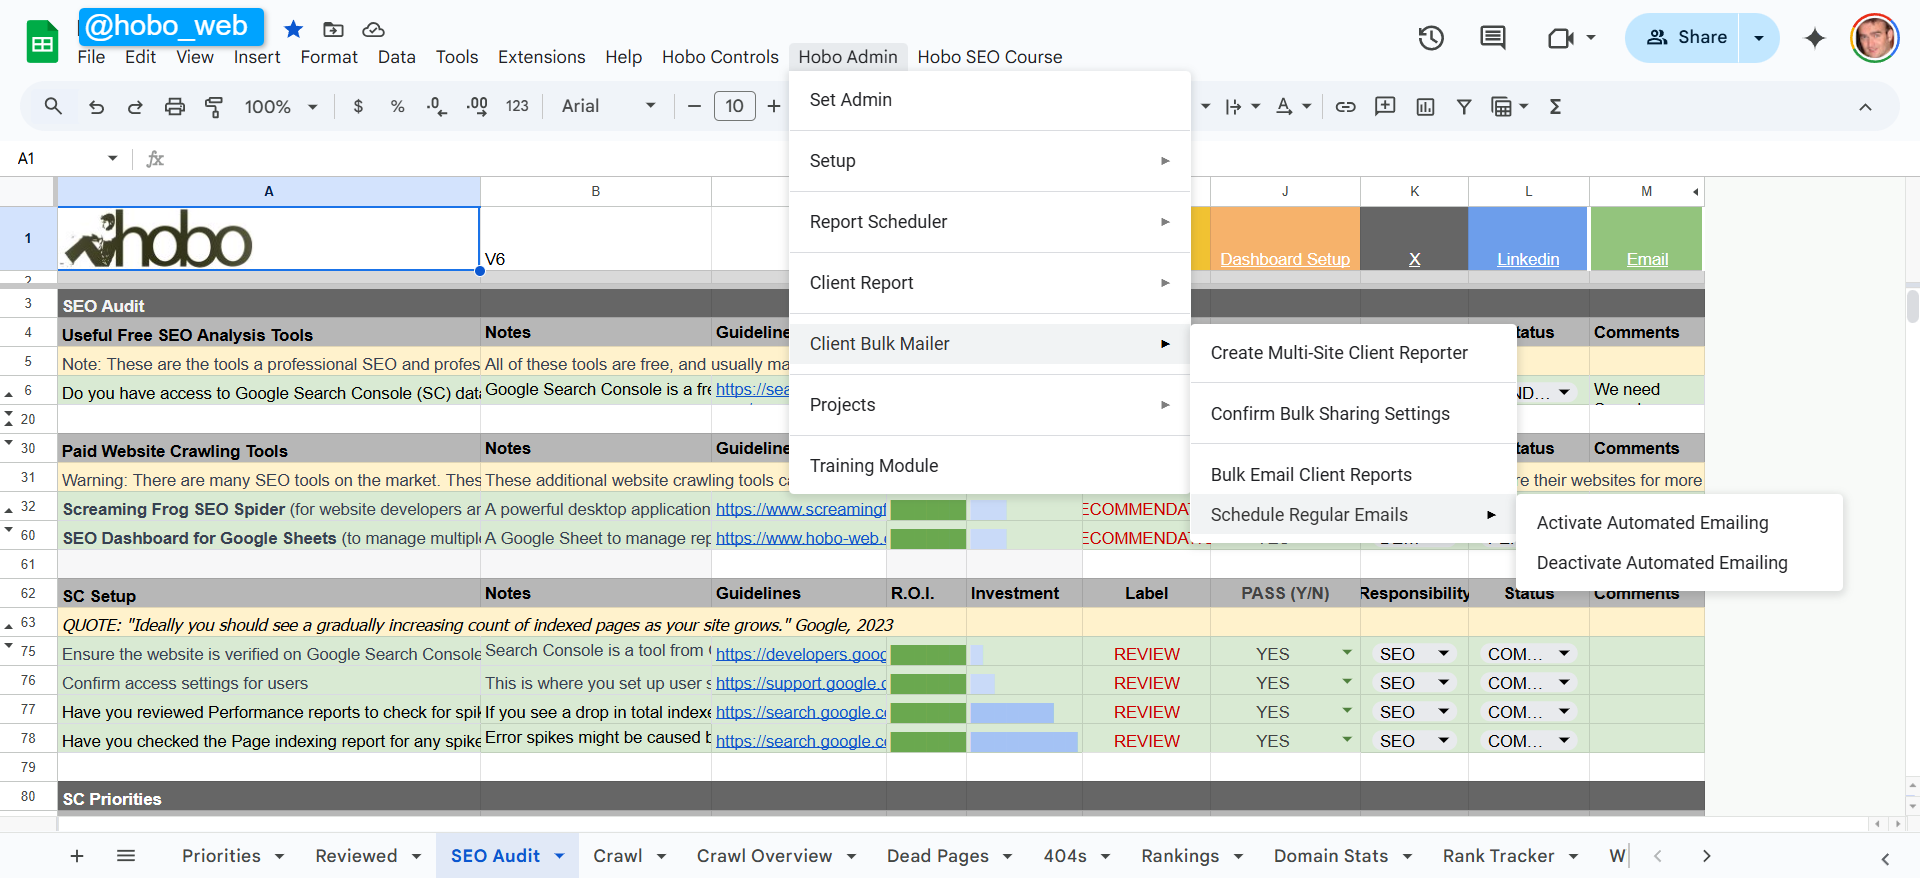
Tip 31: Start the Bulk Client Email Process (Step 1)
- Click on Hobo Admin
- Hover over Client Bulk Mailer
- Click on Create Multi-Site Client Reporter
Tip 32: Confirm Bulk Sharing Settings (Bulk Emailer Step 2)
- Click on Hobo Admin
- Hover over Client Bulk Mailer
- Click on Confirm Bulk Sharing Settings
Tip 33: Send Bulk Client Emails (Bulk Emailer Step 3)
- Click on Hobo Admin
- Hover over Client Bulk Mailer
- Click on Bulk Email Client Reports
Tip 34: Activate Scheduled Bulk Emails
- Click on Hobo Admin
- Hover over Client Bulk Mailer > Schedule Regular Emails
- Click on Activate Automated Emailing
Tip 35: Deactivate Scheduled Bulk Emails
- Click on Hobo Admin
- Hover over Client Bulk Mailer > Schedule Regular Emails
- Click on Deactivate Automated Emailing
For full documentation on bulk emailing functionality, see The Client Bulk Mailer System in the Hobo SEO Dashboard.
Tip 36: Activate the Beginners SEO Email Course
Note: Training courses are currently in beta.
- Click on Hobo SEO Course
- Click on Activate SEO for Beginners Course
Tip 37: Activate the Pro SEO Email Course
- Click on Hobo SEO Course
- Click on Activate Pro SEO Course
For more about Hobo SEO Dashboard, check out the Hobo SEO Dashboard Overview.
See also How to Set Up SEO Dashboard or set up Screaming Frog in Hobo SEO Dashboard.